Auto deploy node app to digitalocean using codeship
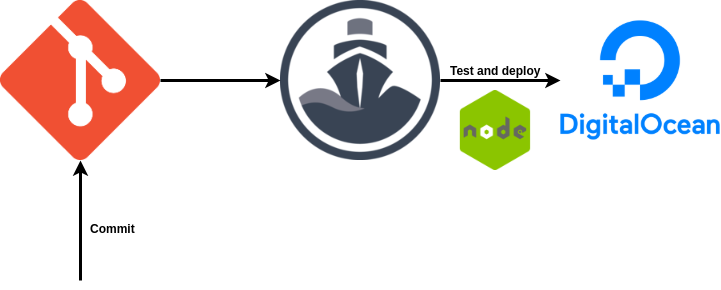
Share on:Edit on:This tutorial explains how to deploy node application automatically to digitalocean droplet every time there is a new commit pushed to Github, Gitlab or Bitbucket.
Tested on the OS :
- Ubuntu 18.04 and later
- Debian 9 and later
- Raspbian 9 and later
Following are the contents.
- Prerequisites
- Install PM2 npm module on digitalocean
- Setup node app git repository on digitalocean
- Configure the project on Codeship
- Copy codeship SSH public key to digitalocean user account
- Push a dummy commit to verify functionality
- Configure Nginx as reverse proxy server
Prerequisites
It’s already assumed that,
- Your node app is already hosted on github / gitlab or bitbucket. If not, clone the Hello World app from here to your git hosting account.
- You already have a Digitalocean account. If not, Signup one on digitalocean.
- Initial server setup has been done on digitalocean.
- Already installed nodejs on digitalocean. I prefer installing node with nvm.
- Your domain nameservers should be pointed to digitalocean droplet. If you don’t have a domain name yet, you can buy one from Namecheap, one of the lead domain name provider for less price.
Do not forget to add an A record pointing to your droplet
Install PM2 npm module on digitalocean
PM2 npm module allows your node application to run in the background, restarting the application without stopping it.
Login to digitalocean droplet using SSH and install the PM2 npm module.
ssh USERNAME@DROPLET_IP
Replace USERNAME and DROPLET_IP with your user account on digitalocean droplet and it’s IP address respectively.
Install PM2 module.
npm install pm2 -g
Setup node app git repository on digitalocean
Git clone the node app repository to your droplet. Make sure you have access to the repository so that you can give permissions to the third party app called codeship in the next step.
git clone CLONE_URL
ex: git clone https://github.com/itsnayabsd/node_hello_world.git
The following script is needed and will be invoked from codeship. Run the following commands in the terminal to create a script called node_app_start in home directory.
echo '#!/bin/sh' > ~/node_app_start
path=$(echo `which npm` | sed 's/.\{3\}$//')
echo "path=$path" >> ~/node_app_start
echo 'PATH=$PATH:$path' >> ~/node_app_start
echo "export PATH" >> ~/node_app_start
chmod +x ~/node_app_start
Configure the project on Codeship
Codeship is a hosted continuous delivery service that focuses on speed, reliability and simplicity. You configure Codeship to build and deploy your application from GitHub to the staging or the production platform of your choice.
So we use codeshitp to deploy to digitalocean droplet when there is a new commit pushed to Github or Gitlab or Bitbucket.
Create an account on https://codeship.com/. After sign up, it will guide you through creating new project. Other way to create project is to click on Projects tab on top navigation bar.
Creating a project
Creating a project involves three steps
- Select an SCM (Source code management) : Select one among Github, Gitlab or Bitbucket. You may need to grant permissions to codeship from the selected SCM.
- Connect repository: Select your node app here.
- Configure project: Select Codeship Basic.
Configure project settings
Now, the configuration takes you to Project Settings in which you see sub navigation bar with tabs Tests, Deploy, Build Triggers etc. Do the following steps.
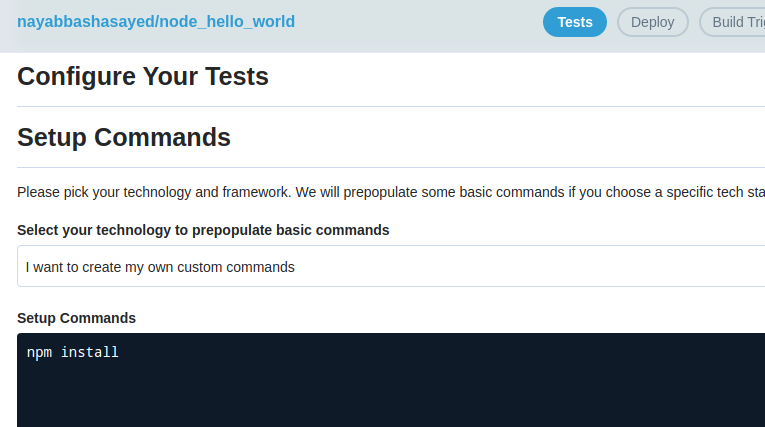
Tests
In the Setup Commands window, type npm install. Go to the bottom of the page and click on Save changes.
Deploy
Click on Deploy buttion. Write the branch name and click on Save Pipeline Settings. On the next step, select the script under Add Deployment section.


In the Deployment Commands window, add the following commands.
ssh USERNAME@DROPLET_IP 'cd PATH_TO_CLONED_NODE_REPO; git checkout master; git pull; source /home/$USER/node_app_start;npm install; npm restart || npm start;'
Replace USERNAME, DROPLET_IP and PATH_TO_CLONED_REPO with your digitalocean droplet credentials.
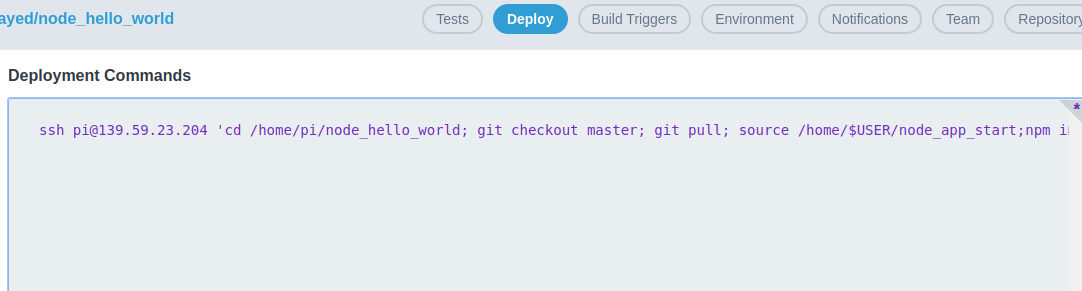
Click on Save Deployment.
We can skip configuring remaining tabs except for the last tab General. We will configure that in the next step.
Copy codeship SSH public key to digitalocean user account
We need to allow codeship build system to login to our digitalocean droplet using SSH. For that we will be storing codeship SSH public key into our droplet.
General
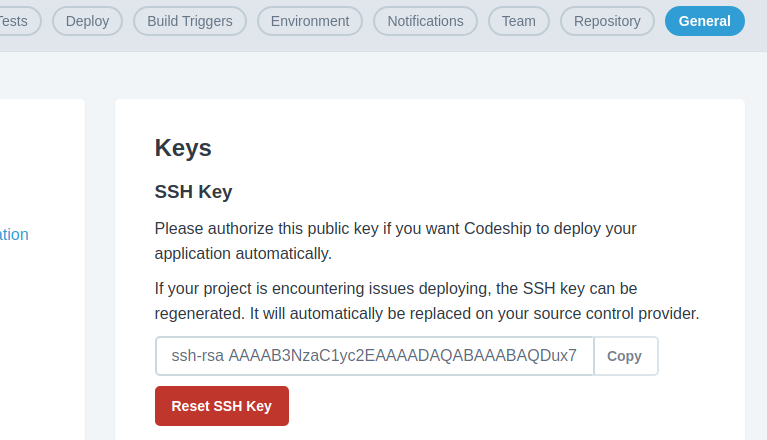
Copy the SSH public key. Login to your droplet user account using SSH. Create and paste the key into ~/.ssh/authorized_keys file.
Push a dummy commit to verify functionality
Create some dummy file with dummy content on your local laptop or desktop. Push that file to github/gitlab or bitbucket.
# On your local laptop or system
git clone https://github.com/itsnayabsd/node_hello_world.git
cd node_hello_world
echo "codeship" > codeship
git add codeship
git commit -m "Codeship dummy"
git push origin master
As soon as the commit push finished, codeship started executing build scripts.
In your browser address bar, enter http://DROPLET_IP:3000/ or DOMAIN.COM:3000. Ex: http://139.59.61.221:3000/ or nayab.xyz:3000. Node runs on the port 3000 by default.
You should be greeted with your node app home page. In the above case, a white page with the message Hello World!.
Configure Nginx as reverse proxy server
Replace the location / { .... } block in your existing nginx config file with the below block of code.
  location / {
      proxy_pass http://localhost:3000/;
  }
The above code passes all the http requests receive to node server. We can now visit the above URLs without port numbers.
ex: http://139.59.61.221 or nayab.xyz. The node app is loaded now on this address.