Digitalocean Ubuntu Droplet Initial Setup
Share on:Edit on:Table of Contents
- Before creating the droplet
- Creating droplet
- Initial droplet setup
- Creating a new user
- Enable firewall
- Copy authorized keys to new user
- Login as new user
Digitalocean droplets are great way to self-host a lot variety of tools and personal projects. This post explains how to properly setup a droplet with Ubuntu OS before setting up any tools/projects.
If you do not already have digitalocean account, please sign up through the link here and get a $100 credit to get you started.

Before creating the droplet
After the successful signing up with digitalocean, go to the projects page. There, on the top right corner you can see the $100 credit that you could use as you like.
Let’s add an SSH key to login securely into the droplet. This section explains how to generate an SSH public key from your Linux system (preferably Ubuntu based system), add the SSH public key to the digitalocean.
Generate keys
Open Terminal in your local system and run the following command to generate private and public keys
ssh-keygen -t ed25519
Just keep pressing Enter until you see the command prompt.
Generating public/private ed25519 key pair.
Enter file in which to save the key (/home/nayab/.ssh/id_ed25519):
Created directory '/home/nayab/.ssh'.
Enter passphrase (empty for no passphrase):
Enter same passphrase again:
Your identification has been saved in /home/nayab/.ssh/id_ed25519
Your public key has been saved in /home/nayab/.ssh/id_ed25519.pub
The key fingerprint is:
SHA256:MwrGlV3fKRSSPGUAlqrvPLvYPXIQtTPUNOQFHSt/ZE nayab@dobglr
The key's randomart image is:
+--[ED25519 256]--+
|     o=N+o..     |
|    .o.-o. ..    |
|    .o*.. +...   |
|   . B....L  ..  |
|  . + * S. O ..  |
|   . . = oo .  ..|
|  .   . .  . .  o|
|   . o...   .  . |
|    o..o.. ..+.  |
+----[SHA256]-----+
nayab@dobglr:~$
The public key is generated at the location ~/.ssh/id_ed25519.pub/
Copy the public key to digitalocean
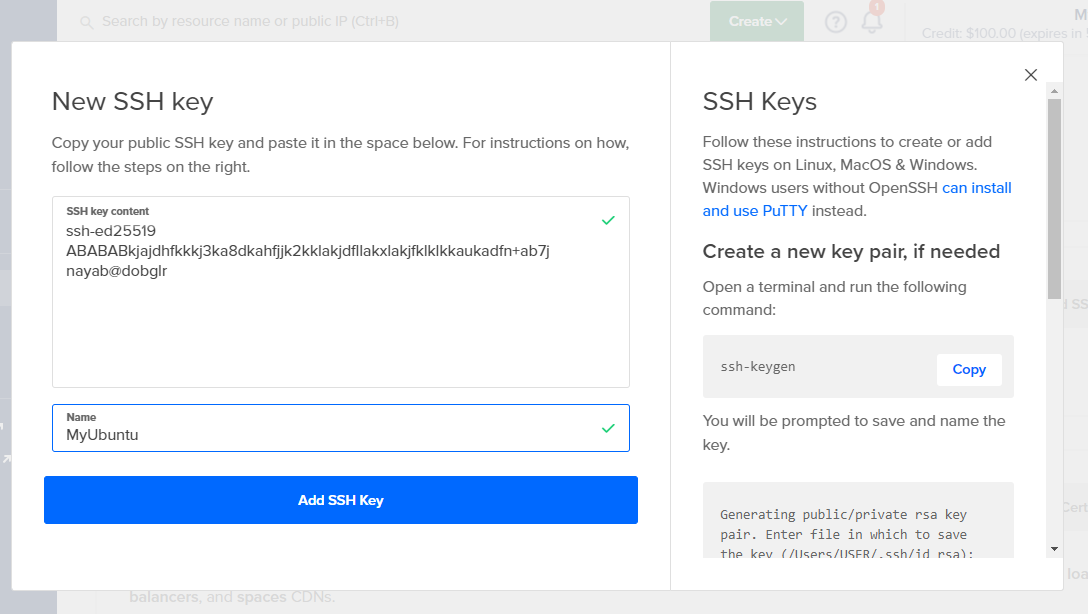
Copy the output generated from the following command. Do not copy any empty spaces or lines.
cat ~/.ssh/id_ed25519.pub/
The key looks like following
ssh-ed25519 ABABABkjajdhfkkkj3ka8dkahfjjk2kklakjdfllakxlakjfklklkkaukadfn+ab7j nayab@dobglr
Now go to digitalocean security page, click on Add SSH Key button, enter the output you copied from above command. Give some proper name to save the SSH key and then save it.
Creating droplet
To create a digitalocean droplet, go to the projects page, click on Create button from the top, and select Droplets from the drop down menu.

Finish droplet creation with the following configuration
- Choose an image -> Ubuntu 20.04 (LTS) x64 under Distributions tab.
- Choose a plan -> Basic
- CPU Options -> Premium AMD with NVMe SSD with $7/month or Regular SSD with $4/month. Premium AMD with NVMe SSD is faster.
- Choose a datacenter region -> Singapore
- Authenticaion i-> Select SSH keys radio button and then make sure your SSH key is selected.
- Select addtional options
- Enable public IPv6 networking. It’s free
- Enable backups if you need it. Paid. $1.20 per droplet in this case.
- Finalize and create -> Choose a hostname -> Enter a hostname name of your choice.
- Create droplet
Initial droplet setup
Go to the Droplets page and note down your droplet IP address.
From your local system terminal, run the following command to log into droplet as root.
ssh root@IP.ADD.RE.SS # Replace IP.ADD.RE.SS with your droplet IP address
Type yes if it prompts whether to continue connecting to droplet.
$ ssh root@IP.ADD.RE.SS
The authenticity of host 'IP.ADD.RE.SS (IP.ADD.RE.SS)' can't be established.
ED25519 key fingerprint is SHA256:98kXKraNiJCjacgTAXFvGRCSwwQR0HYW8ySUk5kPV8OA/58.
This key is not known by any other names
Are you sure you want to continue connecting (yes/no/[fingerprint])? yes
This should get you directly into the droplet as we are using SSH keys for authentication.
Creating a new user
The root account usage can go wrong and can make your droplet unusable. So after you log into the droplet, let’s create a new user account and give admin privileges to it.
Replace USERNAME with your desired name.
adduser USERNAME # Replace USERNAME with your desired name
usermod -aG sudo USERNAME
Enable firewall
Disbale unwanted connections to your droplet and allow only SSH connections. Run the following commands in the droplet as root itself.
ufw app list # List available applications to use with ufw firewall.
ufw allow OpenSSH # Allows SSH traffic
ufw enable
ufw status
Sample commands and output
root@dobglr:~# ufw app list
Available applications:
  OpenSSH
root@dobglr:~# ufw allow OpenSSH
Rules updated
Rules updated (v6)
root@dobglr:~# ufw enable
Command may disrupt existing ssh connections. Proceed with operation (y|n)? y
Firewall is active and enabled on system startup
root@dobglr:~# ufw status
Status: active

To                         Action      From
--                         ------      ----
OpenSSH                    ALLOW       Anywhere
OpenSSH (v6)               ALLOW       Anywhere (v6)
Copy authorized keys to new user
Copy .ssh folder from root to the USERNAME. Replace USERNAME in the below command with the new user you created above.
rsync --archive --chown=USERNAME:USERNAME ~/.ssh /home/USERNAME
Login as new user
Logout from the root account using the following command.
exit
Login as USERNAME
ssh USERNAME@IP.ADD.RE.SS
Replace USERNAME and IP.ADD.RE.SS with the respective values.