The boot sequence of Raspberry Pi 3 Model B
Share on:Edit on:Table of Contents
- Introduction
- RPI3 model B boot sequence
- Download bootloader files
- Add basic configuration in the config.txt
- Copy the files to sd card
- Power up the board.
Introduction
The boot process is the different stages the system goes through from the powering up the device to start the operating system. This article explains the boot process of the Raspberry Pi 3 Model B. Let’s verify the boot process practically too.
RPI3 model B boot sequence
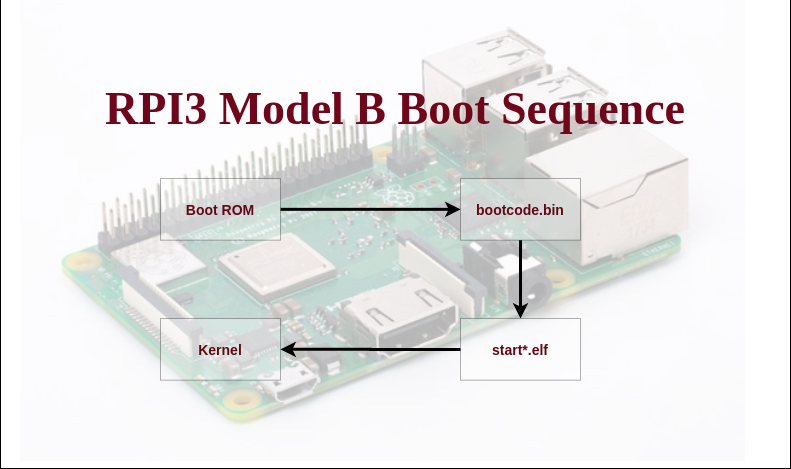
Here are the various stages of RPI3 Model B boot sequence involves -
- The boot ROM (the first stage bootloader) is programmed into SoC during manufacturing of the RPI. This code looks for the file
bootcode.bin(second stage bootloader) in one of the partitions of SD card and executes it. - The bootcode.bin code looks for the file
config.txtfor any third stage bootloader info. If nothing found, it loads the default bootloaderstart.elffrom the SD card and runs it. - The
start.elfcode readsconfig.txtmultiple times to initialize basic hardware, load dtb and kernel into RAM.
The official page to configure config.txt file can be found here.
Let’s boot the RPI practically.
Download bootloader files
Download bootcode.bin and start.elf files from Official rpi firmware repo. These files are proprietary GPU firmware files and are necessary to start RPI3 model B.
Copy downloaded files to ~/rpi3/sdCardFiles/ directory.
mkdir -p ~/rpi3/sdCardFiles
cd ~/rpi3/sdCardFiles
cp ~/Downloads/bootcode.bin ~/Downloads/start.elf ./
Copy the u-boot.bin file compiled from earlier article also to the ~/rpi3/sdCardFiles/ folder.
cp ~/rpi3/u-boot/u-boot.bin ./
Add basic configuration in the config.txt
Create a minimal config.txt configuration file in the ~/rpi3/sdCardFiles/ directory with the following lines.
cat << EOF >> config.txt
arm_64bit=1
kernel=u-boot.bin
EOF
- The
kernel=u-boot.binloads u-boot.bin in the place of actual Linux kernel. - The
arm_64bit=1tells the firmware to start ARM cores in 64 bit mode.
Copy the files to sd card
The ~/rpi3/sdCardFiles/ directory must have the following files.
- bootcode.bin
- config.txt
- start.elf
- u-boot.bin
Prepare SD card
Create three partitions using fdisk and mkfs
- First partition is of size 1GB, type fat32 with label boot. Create filesystem with mkfs.vfat.
- Second partition is of size 512MB, type Linux with label rootfs. Create filesystem with mkfs.ext4.
- The third partition is of remaining of the SD card storage with the type Linux
Once the SD card partitioning is done, copy above mentioned files to SD card.
cp -r ~/rpi3/sdCardFiles/. <PATH_TO_BOOT_PART_MOUNT_POINT> # Use lsblk command to find the mount point
Ex: cp -r ~/rpi3/sdCardFiles/. /media/nayab/boot/
Power up the board.
Connect the USB keyboard to the Raspberry Pi USB. Attach TV/monitor to the Raspberry Pi with the HDMI cable.
Unmount the SD card from the system. Insert the card into the Raspberry Pi SD card slot and power up the board.
You should see the following logs appearing on your TV/monitor.
Net:   No ethernet found.
starting USB...
Bus usb@7e980000: scanning bus usb@7e980000 for devices... 3 USB Device(s) found
       scanning usb for storage devices... 0 Storage Device(s) found
Hit any key to stop autoboot:  0
U-Boot>
U-Boot>
Type help in the U-boot console to see available U-boot commands.