Boot Raspberry Pi 3B from the SD card
Share on:Edit on:Table of Contents
- Introduction
- Making a SquashFS image of the root filesystem
- Re-compile kernel with squashfs as inbuilt module
- Copy the dtb and kernel image to SD card
- Set bootcmd env in the board U-boot console
- Reboot the board
Introduction
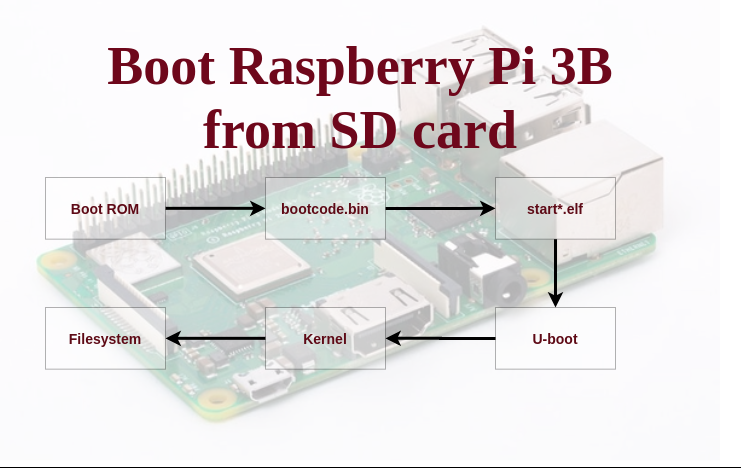
Now that we have our filesystem with necessary libraries ready and kernel modules installed to the root filesystem, we are going to put everything we have compiled/generated so far - bootloader, kernel and the root filesystem - into the SD card and boot from it.
Making a SquashFS image of the root filesystem
The SquashFS is a read only filesystem with high compression and read speed. We are going to create a SquashFS image of our root filesystem and flash that image to the secondary partition of SD card (we created the second partition with 512MB size).
Install squashfs-tools
Install the squashfs-tools package on your Ubuntu development system with the following command
sudo apt install squashfs-tools
Create squashfs image of root directory
mksquashfs ~/rpi3/nfs ~/rpi3/sdCardFiles/rootfs.sqfs -noappend
Flash the squashfs image to SD card
Unmount the SD card partitions using the following commands first before flashing
# Replace <USERNAME> with your Ubuntu system username.
sudo umount /media/<USERNAME>/rootfs
Using the dd command, flash the squashfs image to the second partition of the memory card.
# The second patition name might vary. Check `dmesg` output after inserting the SD card into the system.
sudo dd if=~/rpi3/sdCardFiles/rootfs.sqfs of=/dev/mmcblk0p2 bs=1M
Re-compile kernel with squashfs as inbuilt module
cd ~/rpi3/linux
make menuconfig
Make squashfs as inbuilt kernel module by going into File systems —> Miscellaneous filesystems —> SquashFS 4.0 - Squashed file system support.
Save the config file and recompile the kernel by running following commands.
export ARCH=arm64
export CROSS_COMPILE=aarch64-rpi3-linux-gnu-
export PATH=$PATH:~/x-tools/aarch64-rpi3-linux-gnu/bin/
make -j`nproc`
Copy the dtb and kernel image to SD card
cp ~/rpi3/linux/arch/arm64/boot/Image /media/<USERNAME>/boot/kernel.img
cp ~/rpi3/linux/arch/arm64/boot/dts/broadcom/bcm2710-rpi-3-b.dtb /media/<USERNAME>/boot/
Set bootcmd env in the board U-boot console
Insert SD card into the Raspberry Pi. Power up the board. Stop at U-boot console and run the following commands to boot the Raspberry Pi 3B completely from the SD card.
setenv bootargs earlyprintk root=/dev/mmcblk0p2 rootfstype=squashfs rootwait noinitrd
setenv bootcmd 'mmc dev 0; fatload mmc 0:1 0x2000000 kernel.img; fatload mmc 0:1 0x200000 bcm2710-rpi-3-b.dtb; booti 0x2000000 - 0x200000;'
saveenv
The explanation of the first command as follows -
- The bootargs env value is what will be passed as the kernel command line arguments while booting.
- The root=/dev/mmcblk0p2 tells the kernel to look for the root filesystem from second partition of the kernel.
- The rootfstype=squashfs tells the filesystem type. It is squash filesystem.
- The rootwait tells the kernel to wait until the SD card is ready for the root filesystem.
- The noinitrd tells there is no initramfs created.
The explanation of the second command as follows -
- The bootcmd env value is a bunch of U-boot commands which will be executed every time the board boots.
- The mmc dev 0 selects the first mmc device. Here the SD card. You can check the mmc details with the command mmc info in the U-boot console.
- The fatload mmc 0:1 0x2000000 kernel.img loads the kernel.img image from the first partition of SD card to the RAM address 0x2000000
- The fatload mmc 0:1 0x200000 bcm2710-rpi-3-b.dtb loads the device tree file from the first partition of SD card to the RAM address 0x200000
- The booti 0x2000000 - 0x200000 boots the image (kernel.img) at address 0x2000000 with the dtb file (bcm2710-rpi-3-b.dtb) at address 0x200000 with no initramfs(-).
The final command saveenv saves the environment variables on SD card.
Reboot the board
Enter the following command in the U-boot console to reboot the Raspberry Pi 3B from the SD card.
reset
Congratulations on successfully booting the board from SD card.